Get the Most Out of Scrcpy GUI — The Ultimate Power User's Guide
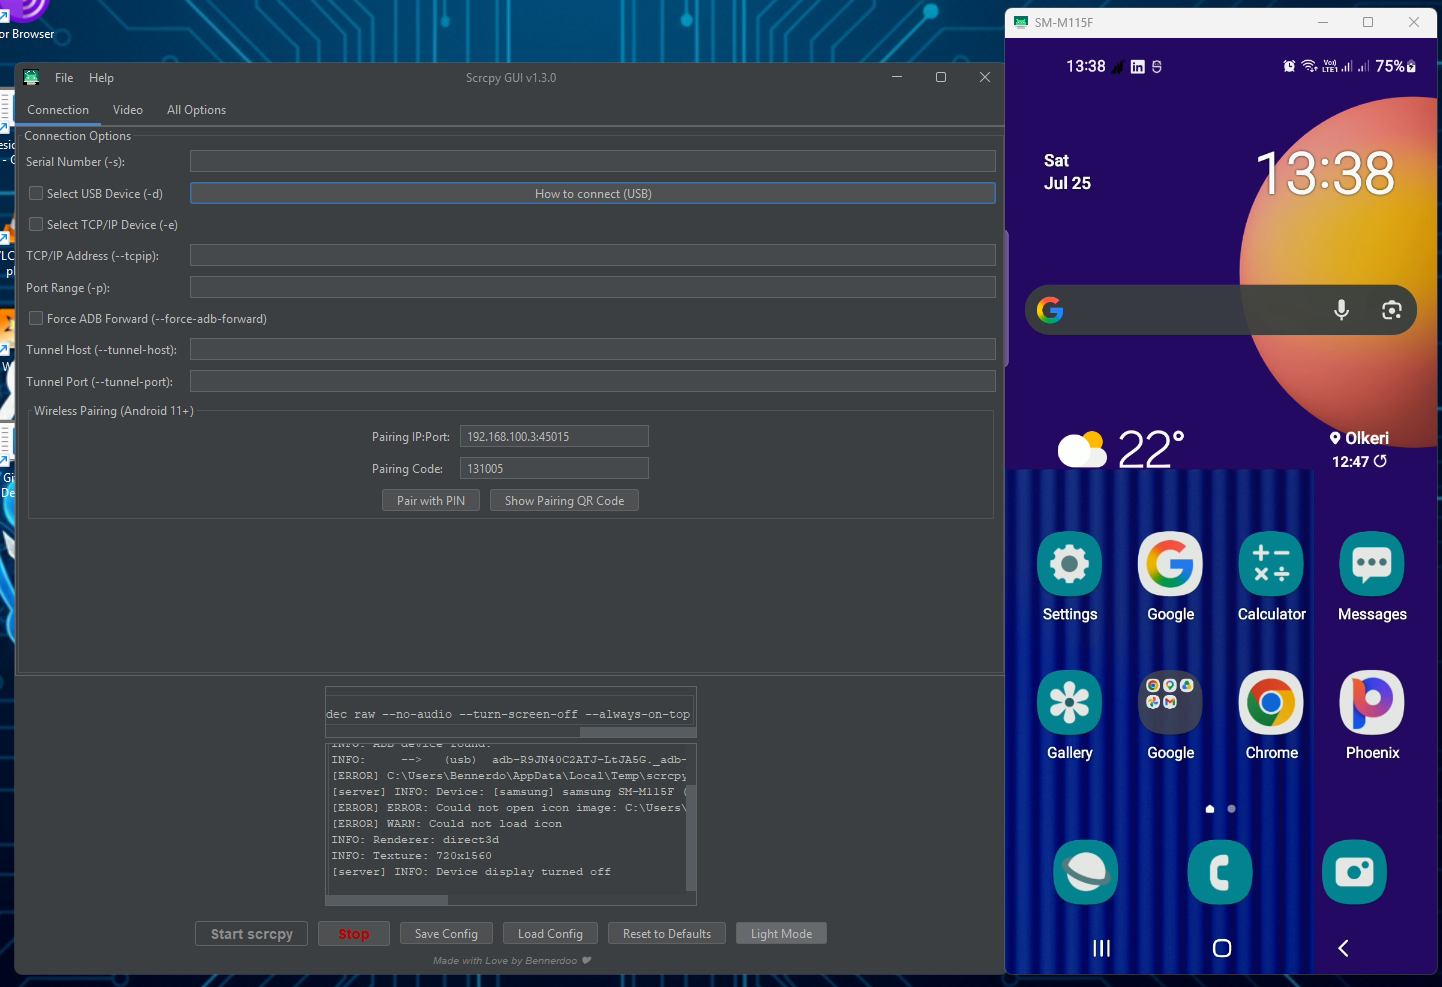 If you’ve ever tried to use scrcpy — the legendary open-source tool for mirroring and controlling Android devices — you already know the power it holds. But let’s be honest: remembering a wall of CLI flags like
 --video-codec=h265 --max-fps=60 --no-audio --record=output.mp4 every single time is exhausting. That’s exactly why Scrcpy GUI exists.
⬇️ Download Scrcpy GUI — Latest Release and follow along.
What Is Scrcpy GUI?
Scrcpy GUI is a beautifully organized, Java Swing-based graphical interface that wraps every single scrcpy command-line option into an intuitive, tabbed UI. Instead of digging through documentation every time you want to tweak a setting, every option is right there — labeled, organized, and ready to click.
Whether you’re a developer testing apps, a content creator recording your device screen, a tech support pro helping someone remotely, or just a power user who loves wireless control — Scrcpy GUI is the tool that makes scrcpy truly accessible.
👉 Contribute, report issues, or star the repo on GitHub
Why Use the GUI Over the Terminal?
| Pain Point (CLI) | Solution (GUI) |
|---|---|
| Memorizing dozens of flags | Every option is visually labeled |
| Typos breaking your command | Auto-formatted commands, zero syntax errors |
| Re-typing the same setup daily | Save & load named configuration profiles |
| No feedback until scrcpy runs | Real-time command preview before you launch |
| High barrier to entry | Click-and-configure for everyone |
The GUI doesn’t hide the command — it shows you the exact scrcpy command it’s about to run in real time. It’s the best of both worlds: visual ease + CLI transparency.
Getting Started in 5 Minutes
Step 1: Download & Install
⬇️ Download the latest Scrcpy GUI release
Grab the .exe installer for Windows — it bundles scrcpy, the Java runtime, and all dependencies. There is nothing else to install. Just run the installer and launch the app.
A cross-platform JAR is also available on the releases page for Linux and macOS.
Step 2: Connect Your Device
- USB: Plug in your Android phone (with USB Debugging enabled in Developer Options) and your device appears automatically.
- Wireless (TCP/IP): Go to the Connection tab → enter your device IP, e.g.
192.168.1.100:5555→ click Start.
Step 3: Click Start
That’s it. Configure your options, hit Start scrcpy, and your device is mirrored on screen.
Mastering Every Tab — Pro Configurations
The GUI organizes scrcpy’s options into logical tabs. Here’s how to squeeze maximum value from each one.
📡 Connection Tab — Go Wireless
For wireless use:
- Enable TCP/IP on your device once via USB:
adb tcpip 5555 - Find your device’s IP in Settings → About → Status
- In the Connection tab, enter
<device-ip>:5555 - Click Start scrcpy — no cable needed
Pro tip: Save this as a named profile (e.g. Wireless-Phone) so you never have to re-type the IP address again.
🎬 Video Tab — Cinematic Quality Control
| Setting | Recommendation | Why |
|---|---|---|
| Video Codec | h265 | Superior compression, sharper at lower bitrates |
| Max Size | 1920 | Full HD — great balance of quality and performance |
| Max FPS | 60 | Buttery smooth — ideal for gaming or demos |
| Bit Rate | 8M | High quality without killing your network |
| Orientation | landscape | Lock rotation for stability |
Best configuration for gaming sessions: Set codec to h265, FPS to 60, size to 1920. Your phone screen will feel like it’s running natively on your monitor.
🎵 Audio Tab — Crystal Clear Sound
Mirror your Android audio to your PC speakers:
- Audio Source:
output(captures device audio) ormic(captures device microphone) - Audio Codec:
opus(low latency) oraac(wider compatibility) - Bit Rate:
128Kfor voice,320Kfor music or media
Pro tip: Set audio source to mic when using your phone as a remote microphone for meetings or recordings.
🎮 Control Tab — Input Your Way
Configure how your keyboard, mouse, and gamepad interact with the device:
- Keyboard Mode:
uhidgives the best compatibility across all Android versions - Mouse Mode:
uhidsimulates a real USB mouse — apps that normally block screen recording respond correctly - Gamepad: Enable this if you’re mirroring a game and want your PC controller to work directly on the Android app
📱 Device Tab — Power & Display Management
Often overlooked, the Device tab has gems:
- Stay Awake: Keep your phone screen on while mirrored (great for long sessions)
- Power Off on Close: Automatically power off the phone screen when you close the scrcpy window — save battery
- Show Touches: Visual tap indicators appear on screen — perfect for tutorials or presentations
- Turn Screen Off: Mirror in the background while your phone screen stays dark — privacy + battery saving
🪟 Window Tab — Multi-Monitor & Layout
- Window Title: Give each session a custom name (helpful when managing multiple devices)
- Always on Top: Keep the mirror window above other apps
- Fullscreen: Instant immersive mode
- Window Position & Size: Lock to specific monitor coordinates for consistent dual-monitor setups
Multi-device power move: Launch two instances of the GUI with different device profiles — one per monitor. Full control of two Android devices simultaneously.
📹 Recording Tab — Capture Everything
Record your screen directly on your PC — no root, no third-party apps:
- Go to the Recording tab
- Set the Record File path (e.g.
C:\Videos\demo.mp4) - Choose format:
mp4(universal) ormkv(no corruption if stopped mid-session) - Hit Start scrcpy
The video is encoded on your PC, not the phone — so it’s always high quality regardless of your phone’s processing power.
Ultimate recording setup:
Codec:       h265
Max FPS:     60
Max Size:    1920
Record File: output.mkv
Audio:       output
One click captures a flawless, full-HD recording with audio.
📷 Camera Tab — Use Your Phone as a Webcam
Stream your phone’s camera to your PC:
- Set Video Source to
camerain the Video tab - Go to the Camera tab
- Select Camera Facing:
front(selfie cam) orback(main cam) - Set Camera Size for your desired resolution
- Set Camera FPS:
30for standard,60for smooth
Your phone becomes a high-quality webcam — perfect for video calls, streaming, or as a secondary camera angle.
⚙️ Advanced Tab — Fine-Tune Performance
- Verbosity: Set to
verbosewhen troubleshooting — detailed logs appear in the output panel - Render Driver: Try
direct3d(Windows) oropenglfor GPU-accelerated rendering - No Cleanup: Keep TCP/IP settings on the device after closing
Configuration Profiles — Your Secret Superpower
This feature alone makes Scrcpy GUI worth it. Instead of reconfiguring every time, save named profiles:
| Profile Name | Use Case |
|---|---|
Daily-Wireless | Wireless, no record, screen off |
YouTube-Recording | h265, 60fps, 1920, mkv, audio on |
Gaming-Session | h265, 60fps, gamepad enabled, always on top |
Webcam-Mode | Camera source, front facing, 1080p, 60fps |
Every profile is stored as a JSON file in:
- Windows:
C:\Users\<username>\.scrcpy-gui\ - Linux/macOS:
~/.scrcpy-gui/
Load any profile in two clicks. Your entire configuration is instantly restored.
The Real-Time Command Preview
Every time you toggle an option, the Generated Command display updates live. This means:
- You can learn scrcpy CLI by watching what the GUI generates
- You can copy the command and use it in scripts or CI pipelines
- You can verify nothing unexpected is being passed before launching
It’s like having a scrcpy command tutor built right in.
Troubleshooting Like a Pro
| Problem | Fix |
|---|---|
| ”No devices/emulators found” | Enable USB Debugging → run adb devices |
| App won’t launch | Re-download the official installer from the releases page |
| Wireless keeps disconnecting | Run adb tcpip 5555 fresh each session |
| Laggy video | Lower Max Size to 1280, reduce bitrate, switch to h264 codec |
| Black screen | Some apps block mirroring — try different Display settings |
The output panel inside the GUI shows scrcpy’s real-time logs — always check there first.
Quick-Start Cheat Sheet
| Goal | Tab | Key Settings |
|---|---|---|
| Basic mirror | — | All defaults, click Start |
| Wireless connection | Connection | TCP/IP: <ip>:5555 |
| HD recording | Video + Recording | h265, 60fps, 1920, mkv file |
| Phone as webcam | Video + Camera | Source: camera, front/back |
| Battery-saving session | Device | Screen off, power off on close |
| Gaming on big screen | Video + Control | 60fps, h265, gamepad enabled |
| Tutorial / presentation | Device | Show touches enabled |
Contributing & Community
Scrcpy GUI is an open-source community project and welcomes contributions of all kinds — code, documentation, testing, and feature suggestions.
👉 Open an issue or submit a pull request on GitHub
Check CONTRIBUTING.md in the repository for full guidelines.
Final Thoughts
Scrcpy is one of the most powerful Android tools ever built. Scrcpy GUI makes it approachable for everyone — not just terminal veterans. With saved profiles, real-time command preview, organized tabs, and one-click launch, you go from idea to action in seconds.
Whether you’re recording content, debugging apps, gaming, or just prefer your phone on your monitor — this GUI has you covered.
⬇️ Download Scrcpy GUI Now
⭐ Star & contribute on GitHub
Made with ❤️ by Bennerdoo — a community-powered GUI for the incredible scrcpy project by Romain Vimont.